One of the advantages of our interactive maps is that they are dynamic. You can easily update them using JavaScript commands. This allows the map to respond to events on the webpage such as toggling locations.
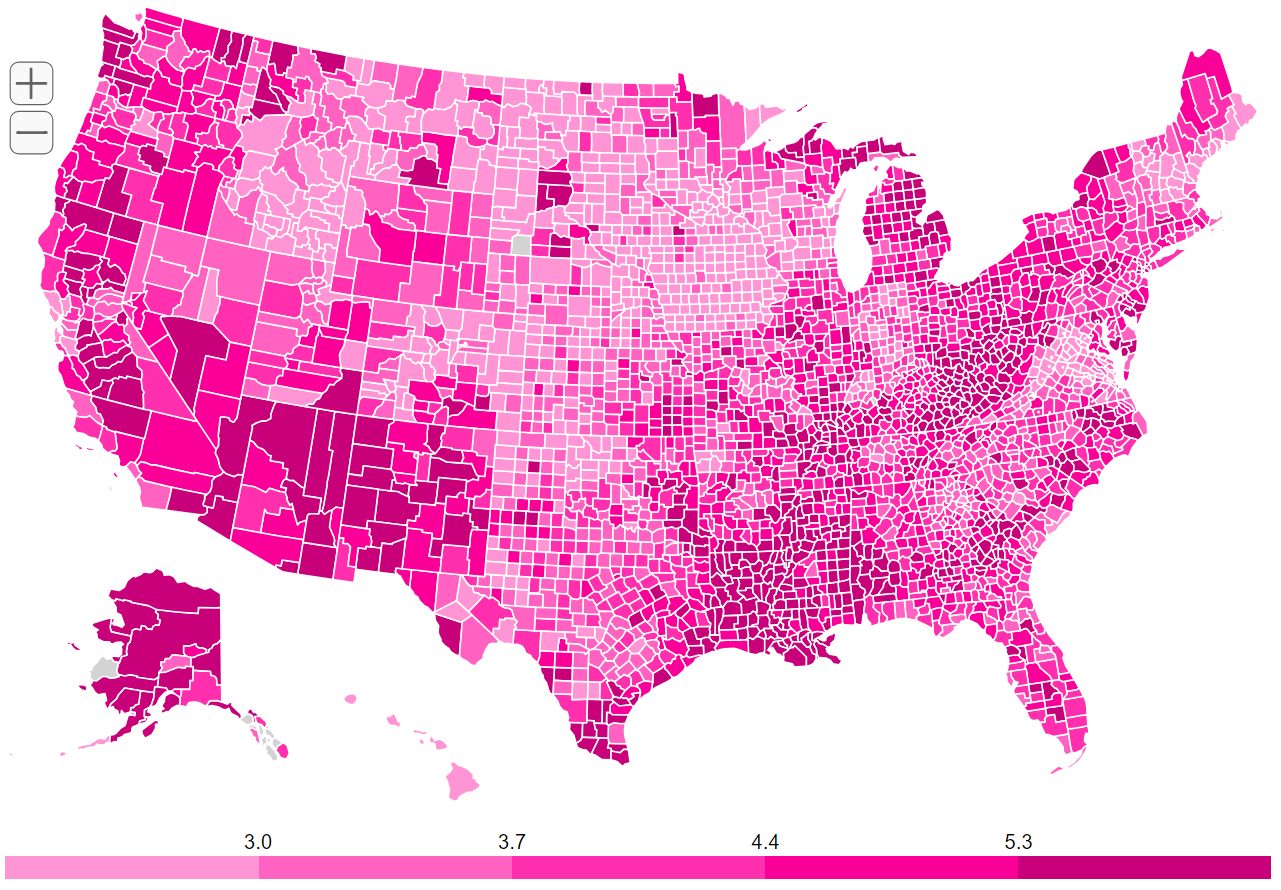
You can use a similar approach to populate the map with information stored in a database. For example, we use our US County Map to visualize unemployment data from the Federal Reserve. It updates itself automatically as new figures are released by the Fed.
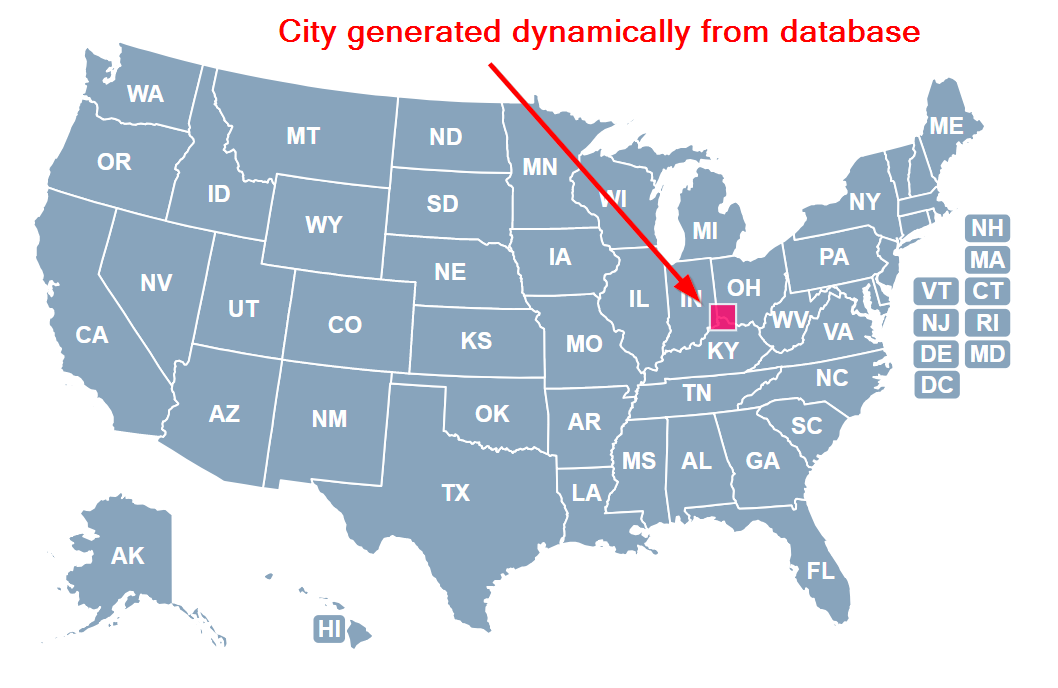
This tutorial will walk you through a simple example demonstrating how data in a database can be incorporated into your map. We'll start with a blank US map and populate it with a city from our database.
Due to the topics involved, this tutorial does require some technical experience. We will use Ubuntu as our operating system, SQLite for our database, and Python as our server-side language. However, you could adapt the following steps to work with your OS, database, and server-side language of choice.
Let's get started:
Download Tutorial Files View Demo
All scripts are organized into folders (by type) and all dynamic files are stored in the dynamic folder. The tutorial assumes all commands are run from the main directory.
For this example, we have a single city, its latitude, and its longitude.
| city | lat | lng |
|---|---|---|
| Cincinnati | 39.107 | -84.504 |
In this example, we'll use SQLite. It's a simple database that stores data within a single file. You can install it on Ubuntu with the following command:
sudo apt-get install sqlite3
We can create an SQLite database called example.db, give it a table named cities, and insert our row of data into the table with a single terminal command:
sqlite3 dynamic/example.db 'CREATE TABLE cities (city string, lat float, lng float); INSERT INTO cities (city, lat, lng) values ("Cincinnati", 39.107, -84.504);'
This will create a database file at dynamic/example.db that contains our data.
We need to export the data into a format that JavaScript can understand. The natural choice is JSON, a human readable format that almost all programming languages can understand.
We'll use the Python script export_data.py to query our database and export the data as a JSON file. This script requires the sqlite3 and json libraries. It looks like this:
import sqlite3
import json

#Connect to database and select all cities
conn = sqlite3.connect('dynamic/example.db')
cur = conn.cursor()
cur.execute("SELECT * FROM cities")
rows = cur.fetchall()

#Convert the data to JSON format and save it as a JSON file
with open('dynamic/example.json', 'w') as jsonfile:
  json_text=json.dumps(rows, indent=4)
  jsonfile.write(json_text)
When we run:
python py/query_database.py
A JSON file is created at dynamic/example.json. If you open it in a text editor, you'll see this:
[
    [
        "Cincinnati",
        39.107,
        -84.504
    ]
]
It would be easy to setup a cron job to recreate this file every week, day, or hour. Alternatively, you could run the script as part of a web app and return the JSON data as an HTTP response. This would allow the map to show the real-time state of your database.
Edit the map's js/mapdata.js file so that main_settings.auto_load='no'. This prevents the map from loading automatically. We want to wait and load the map only after we've updated it.
We'll use jQuery to write a simple script that:
dynamic/example.json filemapdata.locations objectHere's what it looks like:
jQuery(document).ready(function(){
  jQuery.ajax({
    dataType: "json",
    url: 'dynamic/example.json',
    success: function(cities){
      jQuery.each(cities, function(index, value){
        simplemaps_usmap_mapdata.locations[index] = {name: value[0], lat: value[1], lng: value[2]};
      })
      simplemaps_usmap.load();
    }
  });
})
Add the following code to your webpage where you want the map to appear.
<script src="js/jquery.min.js"></script>
<script src="js/mapdata.js"></script>
<script src="js/usmap.js"></script>
<script src="js/update_map.js"></script>
<div id="map"></div>
Your map should now show all your locations (in this example, just Cincinnati).
You could easily extend this example with more cities or by using states (instead of locations).
If you get stuck or need help, don't hesitate to contact us.
Home | License | Privacy | Releases | Testimonials | Resources | Documentation | Order Lookup | All Maps | FAQs
Formerly FlashUSAmap.com and FlashWorldMap.com
SimpleMaps.com is a product of Pareto Software, LLC. © 2010-2024.